Sunday, September 30, 2012

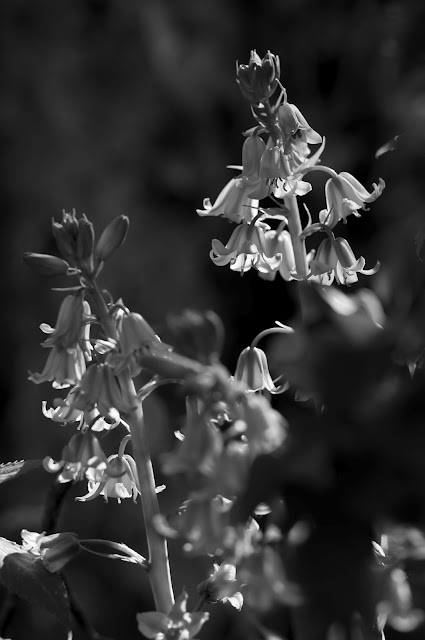
Bluebells ... and black and white

Image #1:  Bluebells with natural colour.
There was some lovely light on the bluebells under the liquid amber earlier today that I thought I'd try a few shots and see what I could do with a black and white treatment of these pretty blooms.

I thought I'd use a long lens as my original idea was to get foreground blooms in focus with a smooth blur for the background bluebells.  I tried this, but felt there was too little contrast and the delicate foreground blooms, whilst sharply focussed, just got lost in the background blur.

f5.6 seemed to give me the sharpness of the bloom I was looking for and using the long end of the 70-200mm zoom helped reduce the amount of background focus.  The idea was to create a black and white shot, but does it work?

I'll post three versions of the same image each processed slightly differently.  Perhaps let me know which you prefer?
Image #2:  Bluebells with increased light in the midtones and dark areas

Image #3:  Goes without saying really - bluebells in black and white.

Thursday, September 27, 2012

New book :-)

Latest addition to my library and something I'm thoroughly enjoying reading.
Some of you may recall my fondness for monochrome images, or should I say chromatic greyscale images?  I spent many happy hours processing black and white film in the darkroom when I was younger and never ceased to be entranced as the image magically appeared on the photographic paper.  It wasn't this magic alone that inspired me to take black and white photographs, there was something else.  There's something very special about a good black and white photograph.  Creating a good black and white image, however, is not that easy ... hence the book.

It's early days yet with my new acquisition, but so far I'm impressed.  There's a lot to learn as I work through the various exercises that will be useful skills for all types of photography.  So, if you don't hear from me for a while you'll now know why.

Sunday, September 23, 2012

Some new toys :-)

I was having a problem with some flash triggers so headed off to the store to get the problem fixed.  The problem with this behaviour is that I always seem to end up buying more stuff.  Yesterday's excursion was no different to any previous trip and I came home with a product table and light tent.  I have a few small products to photograph next month, so thought I'd try out these "gadgets" to see if I'd get better results than the "Heath Robinson" approach to product lighting I'd been using to date.
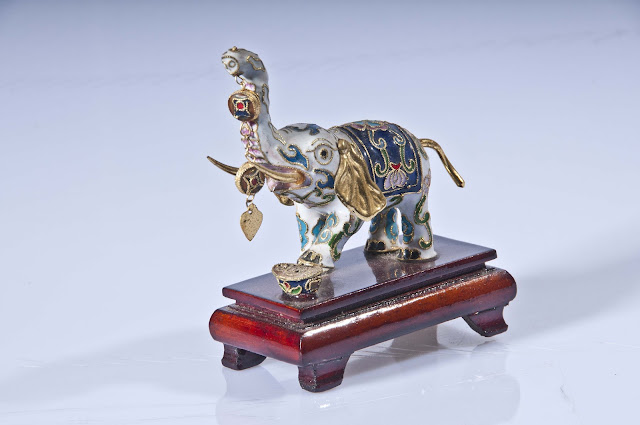
Elephant in a light tent
The first thing I wanted to try was an even light in the light tent.  These tents are pretty easy to make out of cardboard boxes and tracing or greaseproof paper, but I wanted something I could transport, hence the acquisition.  The first shot in this post was taken in the light tent.  Two studio lights, one on each side of the tent, were used to illuminate the elephant and I must admit to being quite pleased with the result; a very even, soft light with shadows just under the elephant.
Pen in a light tent
The second shot was of a pen.  I noticed that as I moved the pen up and down the base of the tent I could get a greater or lesser degree of a "graduated" background.  Something to experiment with further!

I did mention that I bought a product table too.  The idea here was to get something on which I could get some nice reflections.  The third shot in this post is of the elephant again, but on a polycarbonate base.  I'm just playing with this stuff you understand, so the protective wrapping is still intact, but it does give an idea of the types of reflections that can be achieved.  I had a Speedlight under the table, but for some unknown reason it didn't fire.  Lots of experimenting to do with these new acquisitions I suspect!
Elephant on product table.
Oh, I almost forgot to ask ... are you impressed with how clean my sensor is now?  I didn't notice any specs of sensor dirt in these shots, did you?

Tonemapping to the rescue.

I was taking photographs at a lovely house last week and having some issues with light.  I'd taken a couple of Speedlights, my "orb of diffusion" as well as a few other lights and stands.  Some parts of the house, however, were awkward to photograph using anything apart from Speedlights, and in some rooms locating the Speedlights was awkward due to reflections and shadows.  The next two images show the type of problem I was facing.  To get the walls lit as I wanted I was blowing out the bright whites of the bath and shower curtain, but to get the bath and shower curtain detail I was making thew walls very dark.
Average exposure to get the detail in the wood ... blows out all detail in the bath, shower curtain and window.
Exposed for highlights ... looks a bit dark and "dingy"
The answer seemed to be to blend the two images to provide a photograph that illustrated the room as I saw it.  Bright with lovely warm tones from the wood, but also with an ability to discern the bath and shower curtain.  Photomatix Pro and the Tonemapping option led to the image you see below.  Acceptable?  Perhaps let me know what you think?
A tonemapped image thanks to Photomatix Pro.

Dirty little sensor!

Lovely house ... shame about the sensor dirt!

I'd been out taking some property shots and on looking through my images in my office kept seeing this VERY unattractive dirty mark on my images.  The camera is set to clean the sensor at power on and power off, but this dirt just wouldn't shift.  It was quite a significant spec too and was becoming increasingly irritating to remove from each image.  I knew there was a few specs on the sensor, but these weren't very obvious at all.  Not this dirt though!

I suppose, like many other folks, I was somewhat anxious about cleaning my sensor.  I was imagining all the things that could go wrong and how I could end up in a bigger mess than when I started.  I also realised that I wasn't going to be able to live with the sensor as it stood and I wouldn't be happy fixing the problem in Photoshop when a clean would resolve the problem.

A chat with Rod at Auckland Camera gave me the confidence to go along, run through the process and buy the necessary bits to enable me to keep my sensor in a clean condition.  The confidence gained by Rod from running through the process many times made the process seem less daunting and I soon had the necessary understanding and confidence to tackle the problem myself.
A dirty sensor ... lots of dirt all over the place!

I've attached a couple of photos for you so you can compare the before and after results of cleaning the sensor.  I knew there was a few spots of dirt, but really, when you look at the first image it's filthy!!  It really was in serious need of a clean.  Oh, the funny shadows you see in the image are just from the lens, it's not a faulty sensor.

You can definitely see the big piece of dirt and this explains the unpleasant smudge you see on the first image in this post.

The cleaned sensor :-)
Once the image was cleaned another image was taken to see if the sensor was clean.  As you can see from the third shot in this post, the black and grey dirty dots have all gone away!  I must admit to feeling stoked!  To be honest it felt like having a new camera again.  Also, the realisation that there'd be a significant reduction in time needed to correct dirty marks on the sensor was really good news.

So, what did I use?  Three things really.  First of all a blower to clean out the camera both with the mirror up and mirror down.  Then I used the "VisibleDust" swabs and sensor cleaning fluid.  It's a straightforward process and can yield, as you can see from the two shots above, some pleasing results.
Equipment used to clean my sensor.

Monday, September 17, 2012

Downtown


Old Government House, Auckland, New Zealand
I've been meaning to do this for some time now, and for some reason it's just never happened.  Well, that all changed this morning and I managed to get into Auckland City just to relax and take some photos.  I've been quite busy over the past couple of weeks and must admit to feeling more than a little frustrated with the photographs I've been taking of late.  I don't know if it's tiredness, lack of inspiration or just being bogged down with other things, but many of my photographic efforts have been pretty "ho-hum" and I felt I needed something to give myself a bit of a kick.  I can't say I was impressed with today's efforts, but I could sense a change in mood and attitude and could feel myself starting to look at things a little differently.  Perhaps another trip later this week will help a little more?

I took just two lenses.  Nikkor 12-24mm f4 and the Samyang 8mm f3.5 fisheye.  I also took a tripod - always a good idea :-)  The car was parked in Parnell and then I walked up to the University.  There's some lovely old buildings near the University, so I thought that may be a good place to start.  I've been meaning to take photographs of Auckland's old buildings for some time now, and hopefully this year may see the start of that project.  I'll keep you posted!  After a delicious coffee on campus I took refuge from the rain in the library, then headed towards the Old Government House.  I've seen this place before, but never really paid much attention to it.  More fool me!  This building is quite a treasure.  Taking your time provides opportunities to chat to people and observe your surroundings.  According to the gardeners the Queen stayed here with her family and a young Prince Charles played on the lawn you can see in the first image in this post.  It was a no go area for the locals, but that has all changed now and you can go into the building, soak up the atmosphere and get a coffee and muffin should you feel so inclined.  I must admit it brought back memories of Manchester's town hall!
Auckland's Old Government House
The grounds are quite lovely and well worth taking time out and enjoying a wander through.  If you pop over in the next month or two the roses will be in full flower and I can only image what that will look like.  Maybe I'll see you there!!

One of the issues with which I've been frustrated is getting a wide angle shot without distortion.  Part of today's exercise was to use wide angle lenses and then see if, by choice of angle when taking the shot or in post processing I could perhaps remove the distortion in the image.  Besides getting curved verticals, I was also keen to see if I could correct the effect you often see when a building looks like it's falling backwards.  I really wanted verticals to be vertical and parallel, but how much would Capture NX2 or Photoshop let me "correct"? Also, how great an effect did my selected viewpoint have on the image.

Liveview was great for these experiments as I could raise and lower my tripod and change angles of view.  Sometimes there's just nowhere to go and the building looks like it's falling over, but Photoshop does provide a pretty good range of "correction" options.  Shots three and four may give you an idea of my feeble attempts at straightening the shot.  My Camera was on a tripod and I tried to line up my verticals with the left edge of the clock tower.  The effect of this was that other verticals have become less than vertical!  Check out the leaning lamp post for example.  After a quick tweak in Photoshop my verticals look a little better.
University Clock Tower ... original
University Clock Tower ... straightened

I also made a few changes to the first two images (also taken with the Nikkor 12-24mm)  in this post in an attempt to make the verticals vertical.  The next question was how much correction could I achieve with the 8mm Samyang?  I must admit to not holding out much hope, but perhaps let me know what you think?  Shot 5 was taken with the Samyang and isn't too bad from a distortion point of view.  Things look a little odd on the building to the left of the image and I suspect this would be corrected if the camera was raised a little more.  Using the Samyang I find I get easier to correct distortion if I have the horizon smack in the middle of the image ... that is not looking up or looking down onto the subject.  In the fifth shot I'm looking up slightly, hence the greater degree of distortion.
Auckland's Old Government House, 8mm Samyang Fisheye.
I'll leave you with another shot taken with the Nikkor 12-24mm looking towards the clock tower.
Auckland University Clock Tower.